To safely remove edge contamination or lifted dirt from paint protection film (PPF) borders, apply a specialized, diluted isopropyl alcohol (IPA) solution or a dedicated film cleaner to soften the debris, then gently work it out using a fine-bristle detailing brush or a microfiber towel wrapped over a soft plastic squeegee edge. Never pick at the edges with sharp metal tools or fingernails, as this can pierce the film and permanently destroy the adhesive bond. Flushing the treated border with a clean water rinse and resetting the edge with careful heat will seal the film back down securely, preventing future lifting.
Understanding the Anatomy of PPF Edge Contamination
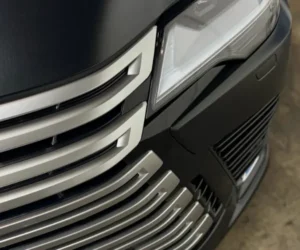
Paint protection film (PPF) defends against rock chips and micro-marring, but its 7- to 8-mil thickness creates a microscopic “shelf” where the film meets the clear coat. Over time, road oils, dust, and waxes gather along these boundaries, a buildup known as edge contamination.
When dirt wedges beneath an exposed seam, it compromises the pressure-sensitive adhesive and causes micro-lifting. Left unaddressed, highway wind turbulence can catch this lifted lip, turning a minor cosmetic flaw into progressive film detachment.
Treating a delicate edge requires a completely different approach than washing a standard body panel. Aggressive scrubbing or harsh chemicals can ruin the installation; instead, you must use targeted solutions that safely extract the grit while leaving the polyurethane matrix and adhesive backing entirely intact.
Essential Tools and Materials for Border Maintenance
| Material Type | Recommended Option PDF | Purpose / Function PDF | Avoid At All Costs PDF |
| Chemical Agent | Diluted Isopropyl Alcohol (10%–15% IPA) | Softens oil-rich road oils and wax lines without melting film adhesive. | Acetone, lacquer thinner, heavy acid wheel cleaners. |
| Mechanical Tool | Soft synthetic or boar-hair detailing brush | Lifts fine dust particles out of seams using a safe, feathered tip. | Metal picks, steel wool, razor blades, and fingernails. |
| Wiping Medium | High-GSM Microfiber cloth wrapped over a soft squeegee | Provides sharp mechanical leverage while safely trapping extracted grit. | Rough shop towels, unwrapped hard plastic scrapers. |
| Thermal Source | Variable-temp heat gun 120 to 140 or paint steamer | Reactivates acrylic adhesive backing and returns elasticity to the film. | Open flames, unmonitored industrial heat torches. |
Having these exact materials ready prevents improvisations that lead to scratches, tears, or permanent lifting. Precision care demands that every tool touching the film possesses a softer physical hardness rating than the polyurethane itself.
How-to: Step-by-Step PPF Edge Decontamination
Step 1: Decontamination and Chemical Softening
- Thoroughly wash the entire panel using standard two-bucket car wash methods to remove loose surface dirt.
- Mist your diluted IPA solution or specialized film cleaner directly onto the affected edge.
- Allow the solution to dwell for approximately 30 to 45 seconds to let the liquid capillary into the microscopic gap.
Step 2: Micro-Agitation with Precision Brushes
- Take your soft-bristle detailing brush and hold it at a 45-degree angle, pointing away from the film’s center toward the outer edge.
- Gently work the brush in small, unidirectional strokes.
- Warning: Never scrub back and forth across the border, as a reverse stroke will drive loosened dirt particles deeper under the polyurethane sheet.
Step 3: The Wrapped Squeegee Sweep
- Drape a clean, lint-free microfiber towel over the edge of a soft squeegee and moisten the cloth with your cleaning solution.
- Place the edge of the wrapped squeegee directly against the PPF boundary line, again angling outward.
- Using minimal downward pressure, sweep along the seam to roll out stubborn black lines while the plush microfiber traps and locks away the extracted grit, keeping it from marring the paint protection film in Tucson, AZ.
Professional Insight: If the dirt has been embedded for multiple years, the adhesive may be permanently stained. In these advanced scenarios, forcing the edge up further to clean it will only worsen the visual defect. Work within the limits of the film’s current adhesion level.
Step 4: Flushing and Visual Inspection
- Once the contamination is drawn out, flush the entire border thoroughly with distilled water.
- This neutralizes any remaining cleaning agents and clears away residual debris.
- Use a bright detailing light to inspect your progress before moving to the re-sealing phase.
How-to: Re-Sealing and Thermodynamic Lockdown
- Ensure Absolute Dryness
Ensure there is absolutely no moisture trapped beneath the lifted section; any remaining water will boil under heat, causing permanent bubbling.
- Apply Controlled Heat
Take a professional heat gun set to a low, controlled temperature (between 120 and 140) or a paint-safe detailing steamer. Lightly sweep the heat source across the edge from a distance of 6 to 8 inches. The warmth softens the polyurethane matrix, increasing its flexibility, while simultaneously warming the underlying acrylic adhesive to maximize its tackiness.
- Execute the Final Press
While the film is warm, use a clean, dry microfiber squeegee to firmly press down on the border, using smooth strokes moving from the inside of the film outward toward the edge. This forces out any residual air and firmly bonds the edge back to the factory clear coat. This process simplifies future cleaning and maintenance, locking out moisture, dust, and automated wash pressure so your vehicle remains pristine over the long haul. To ensure unmatched durability and protection, the border must be completely dried and safely reset using these thermodynamic principles.
Professional Field Audits and Localized Vehicle Care
Maintaining premium protective films requires a deep familiarity with local environments. During a recent audit for a firm in Tucson AZ, our technical team evaluated how extreme desert heat and fine caliche dust accelerate edge contamination by lodging beneath lifted borders far more easily than standard urban grime.
Whether you are navigating the scenic desert bypasses near Dove Mountain or cruising through the city center, intense UV radiation can dry out exposed adhesives over time. Catching minor edge lifting early during standard maintenance washes before the fine desert dust bakes into the backing is the single best way to preserve your investment, which is why our expert services focus on identifying these early vulnerabilities.
For discerning owners, we bring a disciplined approach to every inspection, utilizing climate-controlled environments to perform delicate corrective work. This ensures your repair is executed in a contaminant-free atmosphere, maximizing the longevity of your Tucson paint protection film installation.
The Value of True Technical Expertise
While DIY care can address minor surface maintenance, restoring compromised film borders demands a level of precision that only comes from deep industry experience. Our trusted service is built around providing transparent, high-end care without marketing gimmicks or inflated claims. We operate out of a modern, climate-controlled 6,100 sq ft facility designed to provide an immaculate setting for paint protection film in Tucson, ensuring every vehicle is treated under optimal conditions.
We are a team of dedicated automotive enthusiasts who bring skill, dedication, and passion to every project. We understand that a high-end vehicle is a significant investment, and its protective coatings should look as invisible and seamless as the day they were applied. Our professionalism you can trust means we will never recommend an unnecessary replacement if a safe, precise correction can restore your film’s edge to a flawless standard. We prioritize clarity, honesty, and execution, giving you complete confidence that your vehicle is in the safest hands possible.
People Also Ask
Can I use a pressure washer directly on PPF edges?
No. High-pressure water can slice under the film, shear the adhesive bond, and cause immediate, irreversible lifting or tearing. Keep the nozzle 12 to 18 inches away from seams, spraying at a perpendicular or outward angle.
What causes the black lines along the borders of my paint protection film?
These lines are a collection of dust, road grime, pollen, and dried wax adhering to the exposed, sticky edge of the film. If left unattended, this buildup forms a highly visible dark border requiring specialized precision cleaning to extract.
Is it possible to glue down a PPF edge that has lost its stickiness?
Never use household glues or superglues, as they permanently ruin your vehicle’s clear coat. If an edge loses its tack from prolonged dirt exposure, a professional installer can safely trim the non-adherent section or apply dedicated automotive edge sealers.
How often should PPF borders be inspected and cleaned?
Inspect them during every standard wash. In dusty or high-heat regions like Tucson, performing a detailed border check every three to six months allows you to catch and resolve minor edge lifting before dust permanently ruins the adhesive backing.
Protect Your Investment with Aesthetic Auto Spa
Your vehicle deserves premium care executed with absolute transparency and technical perfection. At Aesthetic Auto Spa, we combine genuine passion with extensive industry knowledge to deliver elite automotive protection, restoration, and climate-controlled storage solutions. We eschew marketing fluff and shortcuts, focusing entirely on high-quality outcomes for car enthusiasts who appreciate true craftsmanship.
Ready to restore your vehicle’s finish or secure industry-leading protection? Contact us today to schedule your custom consultation. Let us provide the clear, reliable solutions and peace of mind you and your vehicle deserve.